|
|
TempElert Help Version 2.2 |
(C) 2003, 2004, 2005 ItWorks, written by Anthony Watts |
|
|
TempElert Help Version 2.2 |
(C) 2003, 2004, 2005 ItWorks, written by Anthony Watts |
Click a menu topic to go there:
Other Help Files:
![]() PowerBug
PC Power State Controller Program (companion program for TempElert) for
shutting down PC's/servers remotely
PowerBug
PC Power State Controller Program (companion program for TempElert) for
shutting down PC's/servers remotely
General System Requirements:
Ethernet Version:
Serial Port Version:
Please refer to the hardware setup guides for the TempTrax Thermometers to complete their setup prior to continuing with setup of the TempElert software! After you have the hardware installed and configured, install the TempElert Software from the CD ROM using the setup program provided. You can then run TempElert and configure the program using the General Settings screen to tell the program where to locate your Ethernet or RS232 TempTrax thermometer device.
What's New in Version 2.2
NEW FEATURES SINCE 2.14
BUG FIXES SINCE 2.14
KNOWN ISSUES:
Old serial numbers from 2.14 won't work in 2.2 To get your new serial number
call us at 530-899-8434
Setting up Temperature Scale ranges to come out even numbers requires the range to be divisible by nine. Due to the way the scale creates "in between" numbers to display, to keep integers displayed, choose a range that is divisible by 9 for example 130-40 = 90 or 0 to 45 = 5x9 etc... when using combinations that cannot be divided into 9 steps, you will end up with numbers that may not be integers or fall on exact whole number boundaries.
Please report bugs to support@tempelert.com
TempElert is an amazing product! This simple and easy to use remote thermometer connects up to ANY TCP/IP compatible Ethernet connection, be it direct, switched, on a hub or behind a firewall and it will report the temperature and status of switches via a web browser! And, with our Exclusive TempElert application, you can have temperature alarms sent to you via Email, Alphanumeric Pagers, Cellphones, or PDA's (like Palm Pilots) that have wireless messaging capability! TempElert also offers support for voice alarms delivered via regular telephone calls (optional hardware required)
Applications:
 Model E Hardware
Specifications
Model E Hardware
Specifications
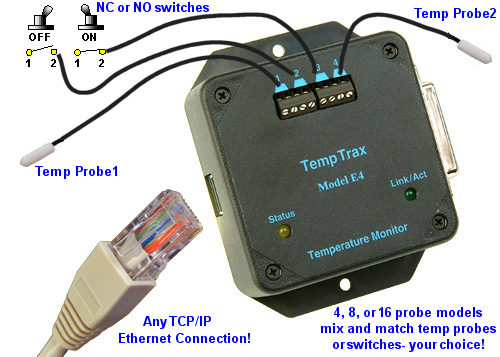
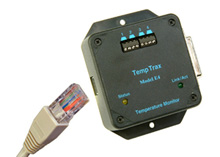
The TempTrax Model E Series of digital thermometers connect directly to your network via an Ethernet hub or switch, offering a unique temperature logging solution. There are currently 3 flavors of the Model E� the E4 (can accommodate up to 4 temperature probes), the E8 (can accommodate up to 8 temperature probes) and the Model E16 (can accommodate up to 16 temperature probes). You can substitute Normally Open (N.O.) or Normally Closed (N.C.) switches in place of temperature probes for reporting limit switch conditions, burglar alarms, door or windows open...or anything you can think of! Specs:
Click here to order
additional units, probes, or accessories HARDWARE
SOFTWARE
|
||||||||||||||||||||||||
Model F Hardware SpecificationsThe TempTrax Model F Digital Thermometer connects to your computer via the serial RS232 port, giving you a convenient and flexible method of tracking temperatures. The Model F supports up to 2 temperature probes. Here are the hardware specifications:
Click here to order additional units, probes, or accessories |
Setup and License Registration
Setting up TempElert can be as simple as plugging in a network cable and assigning an IP address on a Network in the case of the Ethernet (model E4, E8, or E16) version, or it may be as simple as plugging in a serial device to one or more of your PC COM ports if your have the RS232 serial (Model F) version.
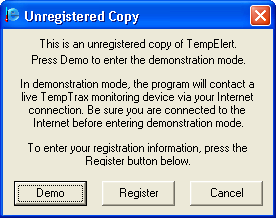
Note: TempElert, when first installed, is unregistered. If unregistered, mode you can run it DEMO mode and it will contact one of our demo model E4 TempTrax units via your internet connection. All features are fully functional, except that you cannot change the hardware device that TempTrax is communicating with.
If you would like to purchase a registration for TempElert, see www.tempelert.com or call WeatherShop at 800-949-8434 and place an order over the telephone.
Installation:
Run the TempElert-Setup.exe program. Install the program to your hard drive. TempElert can run on any drive and in any folder. the default installation folder is c:\program files\tempelert
Then run the program from the start menu. When you first run TempElert for the first time, it will present a screen saying that it is "unregistered". If you are evaluating the software choose the DEMO button, or if you have purchased TempElert, locate your registration number sticker on the CD and press the "register" button.
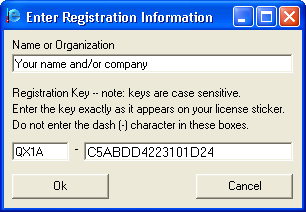
Locate your Registration Sticker on the CD ROM, it looks like this:
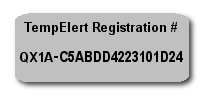 |
Note that the sticker contains a 4 character number and a 16 character number separated by a dash. |
Enter your name and or company information and your registration code as shown below.
IMPORTANT! when entering your registration code, type it in EXACTLY AS YOU SEE IT PRINTED. The code is case sensitive (all upper case). Do not type in the dash.
Double check your code, press "OK" and your TempElert program should be functional. If you've made a mistake, the program will let you know and allow you to correct the mistake. If your registration code is correct, the program will start as shown below.
Startup Screen
When first starting the program, a Splash Screen will appear such as below:
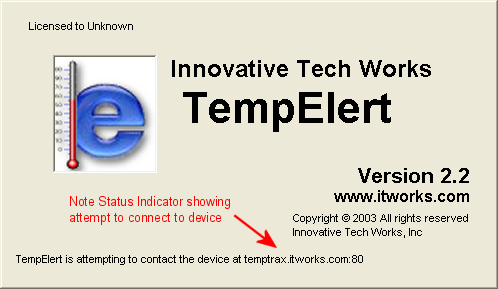
The Splash Screen shows a status indicator that will report on contacting the TempTrax device
After the communications with the TempTrax device is established, you'll see one of 4 different Main Screens based on the type of thermometer device you have connected to it.
A single RS232 TempTrax Model F will show up to two thermometers, while a model E4, E8, and E16 will show 4, 8 and 16 thermometer displays accordingly. For simplicity, and because its the most common configuration, this help dialog will center around the Model E4 Ethernet version. A typical screen appears below:
Main Screen
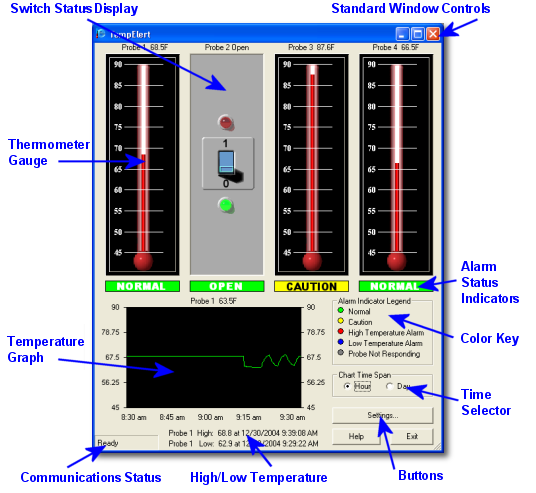
A typical TempElert Screen for the model E4
In a typical Main Screen you have thermometer gauges, or optionally switch status displays, alarm status indicators, a graph showing temperature for the last hour or day, high and low temperature text reports, a color key, and buttons for Settings, Help, and Exit. At the lower left is a communications status display that will periodically change and show communications with the remote thermometer in progress.
Main Screen Controls:
You can click on any thermometer gauge or switch status display to cause the graph and high/low report to change
You can click on the "Chart Time Span" radio buttons to change the graph time display
You can click on any of the buttons.
You can use the Minimize, Maximize, or Exit icons at the upper right of the Window like any standard window control
You can close TempElert using the Alt-F4 keyboard shortcut or Exit button or "X" icon
General Settings
By Clicking on the "Settings" button of the main screen you'll be able to enter the settings dialog as shown below:
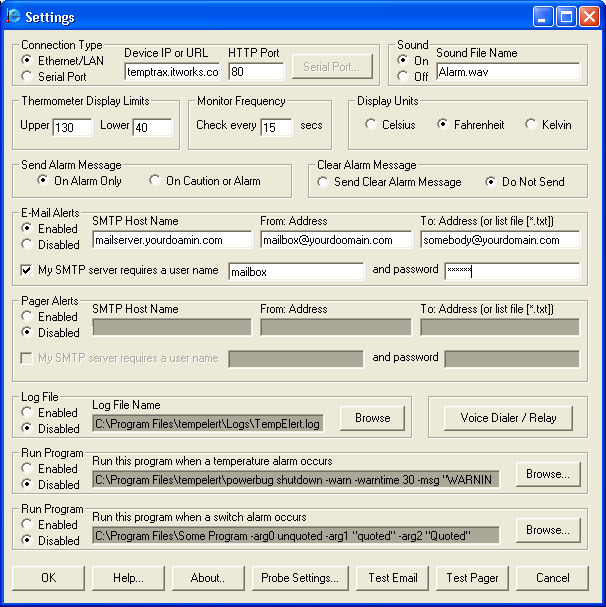
Connection Type:
Here you would choose Ethernet/LAN if you have a TempTrax model E4, E8, or E16 or Serial Port(s) if you have one or TempTrax model F units
If choosing Ethernet/LAN - enter the IP address of TempTrax model E4, E8, or E16 (see separate hardware instructions on how to setup IP address)
Serial Port Operation with the Model F
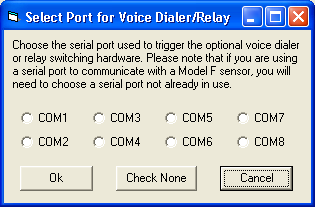
If choosing Serial Port(s) the Select Serial Ports button will become active and you will be able to click it and get the dialog below:
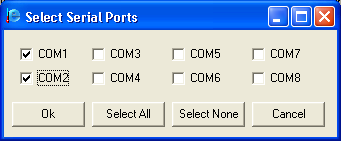
For example: say you have two model F TempTrax units, one on COM1 and the other on COM2, you'd select the two serial ports as shown above. Note that since the TempTrax model F communication settings ( 9600 baud, 8, N, 1 ) are fixed inside the TempTrax unit, there is no need to worry about baud rates, parity, handshaking and other typical serial port parameters. You need only tell the TempElert program on what COM ports the TempTrax units are located.
How Serial Ports and Probe numbers are setup- PLEASE NOTE
Because of the problem of tracking probes and the serial ports that they are connected to, TempElert takes a straightforward linear approach to assigning probes and ports. Each TempTrax Model F unit is capable of supporting two probes. The "A" probe and "B" probe will be on a single com port. For example If a TempTrax model F is connected to COM2: it will be displayed in the TempElert program as Probes 3 and 4, not Probes 1 and 2 unless there is also a model A table of how this works is shown below:
|
Port: |
Probes: |
| COM1 | Probes 1 and 2 |
| COM2 | Probes 3 and 4 |
| COM3 | Probes 5 and 6 |
| COM4 | Probes 7 and 8 |
| COM5 | Probes 9 and 10 |
| COM6 | Probes 11 and 12 |
| COM7 | Probes 13 and 14 |
| COM8 | Probes 15 and 16 |
Example: Should you need to setup a system with four probes, you'd set the first TempTrax Mode F unit to be on COM1 and the second unit on COM2. In the case where you may have conflicting serial port hardware, such as a mouse or a modem, you made need to remove or disable these devices to free the proper serial ports needed for TempElert to run.
Device IP or URL:
Use either IP addresses ( like 192.168.0.10 ) or machine name URL's ( like machinename.yourdomain.com ) for the Model E4/8/16 TempTrax hardware device. Using a machine name allows assignment of a name to your TempTrax E4/8/16 device using your DNS server to be easier to remember for browser or remote checking...for example our demo device at temptrax.it-techworks.com can be used in place of the IP address.
HTTP port:
You can use HTTP ports other than port 80, temptrax hardware models E4, E8, and E16 can be set to use any port for HTTP requests, this enhances security and keep external views from occurring unless the port number is known. If you leave this field blank, the program will automatically use PORT 80 as this is the default port number for HTTP requests in all web browsers as well as the TempTrax E4/8/16 device.
Sound:
You can turn the sound that is played when a caution or alarm condition occurs ON or OFF, and you can also select an alternate WAV file if you choose. To make it easy to choose another WAV file, simply copy them into the same folder that TempElert resides in and type the name in the box provided or alternately enter a complete path and filename.
Thermometer Display Limits:
Here you enter the temperature range that you are most interested in so that the thermometer gauges and the graph. For example say your are monitoring a computer server room. You'd probably not be expecting temperatures below 40 degrees F or higher than 100 degrees, so you may narrow the range so that you have more display resolution. The default is 130 to 40 degrees F, but the settable range is from -40 to 140 degrees F
NOTE: Due to the way the scale creates "in between" numbers to display, to keep integers displayed, choose a range that is divisible by 9 for example 130-40 = 90 or 0 to 45 = 5x9 etc... when using combinations that cannot be divided into 9 steps, you will end up with numbers that may not be integers or fall on exact whole number boundaries.
Monitor Frequency:
Simply how often to check the hardware for new temperature data. The default is 10 seconds. The range is 5 to 999 seconds Note that if you are using a dialup internet connection to connect to a model E4, E8, or E16, setting anything lower than 10 seconds may cause timeouts if your modem is slow. 30 second intervals is best for dialup connections.
Display Units:
Centigrade or Fahrenheight Note: if you change this, it will reset all the stored data and graphs, plus you may need to adjust your Thermometer Display Limits to display appropriately.
E-Mail Alerts:
You can Enable or Disable Email alerts. To Enable them, you must insert your SMTP email server address, which typically is something like smtp.webprovidername.com or possibly mail.webprovidername.com check with your MIS, LAN administrator, or Internet Service Provider (ISP) for more info, or simply check your Email program settings for the address. Some SMTP servers require a username and password to use them, if that's the case with your company or ISP check the "My SMTP server requires a username" box and enter your username and password. Most SMTP servers do not require this if you are operating on the same LAN/WAN or network they reside on
Set the From: Address to be typically TempElert@yourdomain.com for example say you work for ACME and your email address you use is Wileyc@acme.com then you'd want to use TempElert@acme.com some email servers may require that the from address match the domain you are connected to, otherwise you can put anything you want in there. Note: to ensure reliability when passing through some SPAM and Firewall filters, always use a valid email address here. Be sure to TEST TempElert email sending capabilities before relying on them.
Set the To: Address to be wherever you want the email sent to. Do NOT use the same address as the From: Address. If you wish to have many people notified at the same time you can alternately specify a LIST of email addresses. This is simply a text file of line delimited email addresses that you can edit with Notepad or some other simple text editor. To use a list, copy the email list file to the same folder that TempElert was installed to and enter the filename in the box e.g. mail-list.txt or alternately enter a path and filename c:\myfolder\mail-list.txt
A typical mail list would look like this:
tweety@acme.com
wiley_coyote@acme.com
foghornl@warnerbrothers.net
sylvester@cartoon.animators.org
Pager Alerts:
TempElert sends reduced character messages of typically 80 characters or less to fit into any mobile device display. Alphanumeric pagers, PCS cellphones with wireless messaging, and Palm Pilots/PDA's with wireless messaging are all supported. Pager alerts use the same SMTP server settings as email alerts, but do not require email alerts to be enabled, only that the SMTP info be present in the email dialog boxes.
Set the To: Address to be typically phonenumber@yourdomain.com for example say you have an AT&T PCS cellphone and your phone number you use is 530-555-1212 then you'd want to use 5305551212@mobile.att.net
There are all sorts of mobile Email and Pager devices that can receive email from TempElert some require the service to be turned on. Check with your wireless provider to get the exact email address for the wireless devices you wish to notify.
If you wish to have many people notified at the same time you can alternately specify a LIST of pager email addresses. This is simply a text file of line delimited email addresses that you can edit with Notepad or some other simple text editor. To use a list, copy the email list file to the same folder that TempElert was installed to and enter the filename in the box e.g. pagerlist.txt or alternately enter a path and filename c:\myfolder\pagerlist.txt
Set the From: Address to be wherever you want the email to appear to come from. Do NOT use the same address as the To: Address. This can be anything you wish, but some email servers require the domain name to be the same as the servers so if your email SMTP server is smtp.acme.com don't use an email From: address that is name@somplaceelse.com
SMTP Server username and password authentication:
The dialog "my SMTP server requires a [username] and [password] is for mail servers that have anti SPAM relay prevention. In order to send an email, the server must recognize you as an authenticated user. In this case, you would need to create a mailbox on your mailserver such as "tempelert@mydomain.com" and put the username "tempelert" and the password you assigned into this section. You should always have a valid mailbox on your mailserver to use as the "from" address or sender as many mailservers do a remote lookup to see if an actual mailbox exists for the sender on your server. This is a SPAM prevention tool, but can prevent your alert email from being received if you don't have a valid mailbox.
Its always a good idea to use the TEST EMAIL button to ensure that delivery goes through.
TEST EMAIL and TEST PAGER buttons:
These buttons will initiate an email or pager text message to the email or wireless device email addresses you have specified. It will label the message sent as a "test" message.
Pressing these buttons will open a command prompt window, which will shows the actions in progress as the emailer program connects to the mail server and sends the message(s). You should watch for any error condition that is displayed, as it will help you determine what may have gone wrong, often it will provide clues. The most common problem is a misspelling, a misplaced period or @ sign or missing info in the mail server URL.
Of course if the test is successful, you'll be able to get the email or pager message. The dialog on the command prompt window will also say "xx bytes sent successfully" if the email or pager text message succeeded in being sent.
Log File:
You can choose to have a log file written of all measured data plus a date and time stamp on each probe when the measurement is taken. You can enter a complete path and filename, or if you just use a filename like temperaturelog.txt it will be automatically placed in the \tempelert\logs folder. The log is in plain ASCII text and can be viewed with Notepad, Wordpad, MS-Word and other word processing programs. If the TempElert program runs continuously, each night at midnight, the log file for the day is written to a file with the name format logfilename-2-28-03.sav if for example the day was February 28th, 2003. Then a new log is started for the next day.
Run Program: (temperature alarm)
This feature when enabled, allows you to run an external program when an TEMPERATURE ALARM condition occurs, such as an over temperature. It will NOT run when a CAUTION alarm occurs or when an alarm is cleared. The program can be run in conjunction with any other alarm feature such as playing a sound, or sending an email or pager alert. Any Windows compatible program can be run, and arguments can be passed via the command line for the program. Included with TempElert, we provide a program called PowerBug which you can install on remote PC's or servers.
See the details on POWERBUG here:
![]() PowerBug
PC Power State Controller Program
PowerBug
PC Power State Controller Program
PowerBug can send command to via LAN/WAN to cause a shutdown. In the case where you may need to send commands to multiple computers, use a BATCH FILE containing multiple PowerBug commands and call the batch file from the Run Program: command line. Use a plain text editor such as notepad to edit the file.
Run Program: (switch alarm)
This feature when enabled, allows you to run an external program when an SWITCH ALARM condition occurs, such as a burglar alarm. Any Windows compatible program can be run, and arguments can be passed via the command line for the program. The program can be run in conjunction with any other alarm feature such as playing a sound, or sending an email or pager alert. For example, you may have a program that connects to a remote auto dialer device to dial a local security agency if a burglar alarm switch is tripped or a door/window switch is activated.
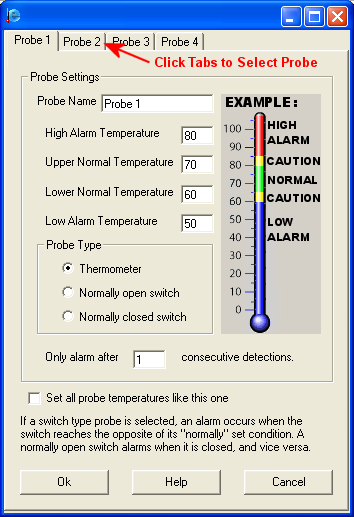
By Clicking on the "Probe Settings" button of the Settings screen you'll be able to enter the settings dialog as shown below. Depending on which model you have, you may see 2, 4, 8, or 16 Probe positions at the top.
 |
Conditions for Temperature generated
alarms:
Note: anytime an Alarm or Caution Condition is "cleared" i.e. the temperature returns to normal, the indicator on the main screen will reflect that and if email or pager messaging is enabled, an "alarm cleared" message will be sent (unless specified not to send an alarm cleared message). Only Alarm after [X] consecutive detections : (false alarm prevention) this allows you to set a "must happen x number of times" value before alerts sent email, pager, or voice dialup occurs. This is useful for a situation where somebody just opens a door briefly and causes a temperature spike, but is not an actual alarm situation yet. Default is 1...to prevent false alarms from brief over temp conditions set to 2 or higher. Please note that the amount of time from the first detection to an actual alarm is determined by the "monitor frequency" setting. Thus if the TempElert software is set to check the temperature once a minute, and the Only alarm after [x} consecutive detections is set to 3, then it would be three minutes before an alarm is sounded. |
Use the TABS at the top to select which probe to edit. Note that the Probe 1 position has a "Set all probes like this one" checkbox which allows you to program all other probes with the same values as Probe 1. This saves time if you are monitoring a series of identical conditions or locations, such as a group of refrigerators.
You can optionally give each probe or switch a name, such as "Server1" or "Fridge3". A maximum of 8 characters is allowed.
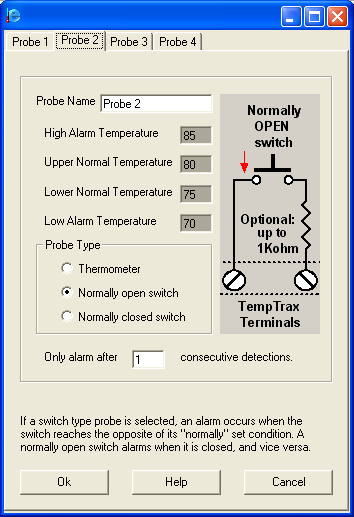
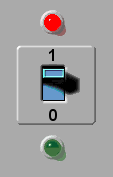
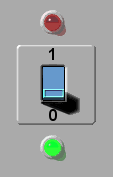
You can also choose whether the probe is a thermometer or a switch. When choosing a switch, there are no settings for upper and lower Alarm and Caution temperatures as they become grayed out.
The TempElert software allows you to specify:
Conditions for Switch generated alarms:
Note: anytime an Alarm or Caution Condition is "cleared" i.e. the temperature returns to normal, the indicator on the main screen will reflect that and if email or pager messaging is enabled, an "alarm cleared" message will be sent.
 |
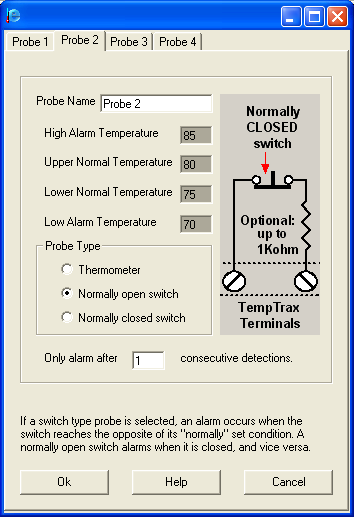 |
Notice the wiring diagram on the menus above. Switches can be wired directly to the TempTrax probe terminals using standard insulated wire. There is no significant voltage or current, and therefore no shock hazard. For very long cable runs, the resistance in the wire can total up to 1000 ohms (1Kohm) and the switch will still function correctly. You can also use other types of switching devices so long as their internal resistance plus the resistance of the wire does not exceed this value.
Wiring directly across the terminals with a very low resistance switch, essentially a short will not cause any harm on any of the TempTrax hardware models.
For making simple burglar alarms or status alarms for doors and windows you can use magnetic reed switches or contact window foil sensors of the type normally used for such applications. For a complete line of switch and alarm accessories, see www.tempelert.com
Only Alarm after [X] consecutive detections : (false alarm prevention) this allows you to set a "must happen x number of times" value before alerts sent email, pager, or voice dialup occurs. This is useful for a situation where somebody just opens a door briefly and causes a temperature spike, but is not an actual alarm situation yet. Default is 1...to prevent false alarms from brief or spurious switch change conditions set to 2 or higher.
Please note that the amount of time from the first detection to an actual alarm is determined by the "monitor frequency" setting. Thus if the TempElert software is set to check the temperature once a minute, and the Only alarm after [x} consecutive detections is set to 3, then it would be three minutes before an alarm is sounded.
You can change the images that are displayed in the TempElert Alarm Status Boxes as well as the Switch Status displays. The TempElert program calls the images for these displays from the \TempElert\images directory. These files are in standard Windows BMP format, 258 colors (8 bits) and can be edited or replaced using most any PC paint program. Just be certain to maintain the size of the original images.
For example, you may wish to change the switch status display images to show the actual device rather than a switch picture, or you may want to change the wording in the alarm status indicator boxes....all easily done by using a paint program.
 |
 |
|
|
|
|
Using an external hardware console activated via a serial port on the host PC, TempElert can now make a telephone call and delivery of pre-recorded voice alert messages to any regular telephone, cell phone, or voice pager. Support for multiple recipient numbers and remote cancel features are included. Purchase our Automatic Voice Dialer at www.tempelert.com This device offers an improved level of alerting by using the telephone to succeed where emails and pager text messages may not.
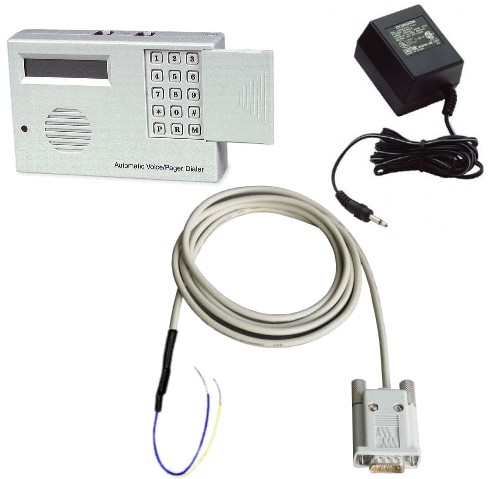
The Automatic Voice Dialer features busy-line and no-answer detection to ensure prompt transmission of up to 2 prerecorded messages delivered sequentially to as many as 4 standard telephones, cellular phones, voice and/or numeric pagers. Messages to both local and long-distance calls can be transmitted. When activated, the dialer instantly begins calling the numbers in sequence, delivering each message 1 to 3 times in a row, in accordance with the pre-selected number of dialing attempts.
The Automatic Voice Dialer is programmable, offering customization to fulfill virtually any residential or business alerting requirement. Plain-English prompts on the LCD screen walk the user through the process in a timely manner.
Features:
Programming options abound, allowing the user to:
Program up to 2 separate input channels with individually enable/disable, entry/exit delay and activation options (Normally Open (N.O.), Normally Closed (N.C.) (dry contact or voltage activation) including momentary and continuous activation for each).
Further individualize each channel by selecting the delay times, telephone/pager numbers to be dialed and the specific outgoing messages to be played.
Operation of the Voice Dialer
NOTE: After completing a test to ensure the voice dialer is responding to the serial port activated by TempElert, be sure to return to TempElert settings to "normal" to prevent false alarms.
Typical problems are outlined here:
Problem: Can't connect to the remote TempTrax Model E Device via LAN or Internet
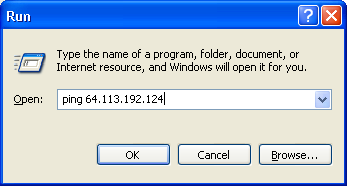
Solution: Check the IP address in the TempTrax and make sure its set the same as the TempElert settings dialog, also check to make sure that your network is functional and that you can actually reach the TempTrax Model E thermometer from your location. You can use the Windows PING command to check to see if you can reach it.
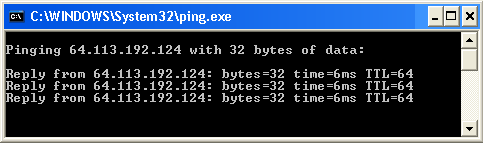
The PING command can be called from the Windows Start>Run menu, see below. To test it you can use one of our demo TempTrax Model E4's at 64.113.192.124 that we have online 24/7 in the ItWorks www.weathershop.com server room.
When running, the PING commend will open a Windows Command line dialog box, show the status three times then close.
Substitute the IP address for your TempTrax to be sure that you can reach your own TempTrax on your network. If you are able to, then the problem may lie in the setup of the TempElert program IP address. It could also be related to how your internal network is setup. Sometimes a firewall or proxy server can prevent certain HTTP requests from spanning two different parts of a network. Consult with your network administrator for help.
Other Solutions: Connection problems can be caused by several things, be sure to check all of these...
Problem: Can't connect to the TempTrax Model F Device via RS-232 serial port.
Background: There are no settings for RS232 communications required in the TempElert program because the TempTrax model F does not communicate at any other baud rate except 9600, 8 bits, No parity, 1 stop bit or commonly called 9600, 8N1. So there is no need to check these settings anywhere as the TempElert software automatically configures your RS232 port for these settings.
Only 4 serial port lines are used with the TempTrax Model F device� Transmit, Receive, DTR, and Ground. so if you need to wire a cable extension, only these 4 lines are needed. Also, TempTrax does not use hardware flow control or software flow control. The DTR line must be "high" to cause the TempTrax to begin to communicate, but again, all of these conditions are set automatically in the TempElert software. We only provide them here for your reference.
Solution: Check to see that you have the correct cable installed. The TempTrax Model F ships with a 25 pin to 9 pin RS232 Cable. TempTrax Model F requires whats called a "null modem" cable. See the cable pinouts below:
| TempTrax- 25 pins | PIN# | PIN# | Computer- 9 pins | |
|---|---|---|---|---|
| Transmit Data | 2 | ---------- | 3 | Receive Data |
| Receive Data | 3 | ---------- | 2 | Transmit Data |
| Signal Ground | 7 | ---------- | 5 | Signal Ground |
| Data Terminal Ready | 20 | ---------- | 4 | Data Set Ready |
All other pins are unused and can be left unconnected.
Solution: Check to be sure you have the TempTrax installed on the correct serial port. Many PC's don't have the COM1 and COM2 serial port labeled on the rear chassis, but refer you to the manual for the motherboard instead. Simply swapping the port your are plugged into may solve the problem.
Solution: Check your computers Hardware Device Manager (in Windows control panel, under System and its Properties) to be sure your serial ports are actually enabled
Contacting Us for Support, Parts, and Accessories
ItWorks specializes in solutions for television and weather for all levels of the industry, from desktop video, to cable TV, on-air, live broadcast solutions. We also specialize in unique Internet solutions for weather and broadcast. ItWorks is an authorized distributor for many broadcast video products, and we can offer custom solutions for a wide variety of needs. ItWorks provides weather data and custom computer systems and services for the Broadcast and Computer Graphics Industry.
ItWorks is also a leader in supplying Internet Weather Content via our IntelliWeather Service. We supply dozens of TV stations in the US with custom branded weather bulletins, imagery, and forecast products. See www.intelliweather.com for details.
Click here to order additional temperature sensing units, probes, or accessories
For professional weather
equipment such as anemometers, barometers, and other measuring systems:
see WeatherShop at www.weathershop.com
| Telephone: 530-899-8434 |
FAX: 530-899-3333 |
| Postal and
Shipping address: ItWorks 527 Flume St., Chico, CA 95928 |
Electronic mail
General Information: info@it-techworks.com |
The TempTrax Models E and F use thermistors for sensing temperature. When a thermistor fails, the TempTrax will report back as an "open" circuit and give a reading of -99 Conversely, if a short occurs, it will read a maximum value of 255. This feature is useful for connecting switches such as burglar alarms, limit switches and other types of switches to the TempTrax for detection, display, and reporting by the TempElert software.
The TempElert software allows you to specify:
a "normally open" switched circuit which would normally read -99.9 in the log but is translated by the software to display a "0" (zero) on the display
a "normally closed" switched circuit which would normally read 255.0 in the log but is translated by the software to display a "1" (one) on the display
For switching devices that may have a small resistance, you can allow for up to 1000 ohms of resistance in a "closed" circuit and still have proper detection. For example, a long wire combined with a switch.
For Specifications on the Thermistors used by the TempTrax unit see this thermistor spec document (adobe Acrobat PDF format) the thermistor follows the "D" specifications.
The user (licensee) is granted a single
license by the licensor (ItWorks) for use on a single computer. User also agrees
not to duplicate any part of the TempElert program, reverse engineer, resell,
redistribute, or in any way modify the program unless granted express permission
by IntelliWeather or Universal Software Systems. User agrees to abide by US
Copyright Laws. This program is protected by copyright law and international
treaties. Unauthorized reproduction or distribution of this program may result
in severe civil and criminal penalties, and will be prosecuted to the maximum
extent possible under law.
The data and information displayed by the TempElert program is based on
measurements made at the licensee location. The user is solely responsible for
the content and accuracy of the information contained in the TempElert. IN NO
WAY will ItWorks, TempElert, or its parent companies be held liable for
incomplete, false, or misleading information contained in any of these displayed
or retransmitted data. USE AT YOUR OWN RISK AND DISCRETION! TempElert should not
be used for the protection of human life or life support monitoring and no claim
is made for the suitability of TempElert for use in such situations.
Use in Critical Life Support Systems:
The Product has not been tested for use in critical life support systems. If
Licensee desires to use the Product in a critical life support system, then
Licensee does so at its own risk and agrees to indemnify and hold Licensor
harmless from any claim arising out of the use of the Product in life support
systems. Critical life support systems are defined as those where a failure of
the Product may lead to property damage, human injury or death.
TempElert receives and sends its alerting messages and data via the Internet and
delivers the information to its users over the Internet to their computer.
Because the Internet is by nature unstable, unreliable and unmanageable,
TempElert cannot guarantee uninterrupted functionality of its services. User
hereby agrees that it will well and truly indemnify and save harmless ItWorks,
TempElert, and its parent companies from all manners of suit, actions, damages,
charges and expenses, including attorney and counsel fees related to any
temperature or weather event, action or inaction on the part of the user,
related to or stemming from use of or lack of use of this program. ItWorks and
TempElert in no way shall be liable in any way to the user beyond the purchase
price of the TempElert program.
The user (licensee) agrees that sole remedy for any liability is limited to the
purchase price of the TempElert software.
By choosing to press the "I Agree" button during setup, user agrees to the terms
and conditions of use stated above.
Updated 07/14/2011 by Anthony Watts
